|
Vignette-in-a-Box
Submitted by Al LaFleche
Gallery
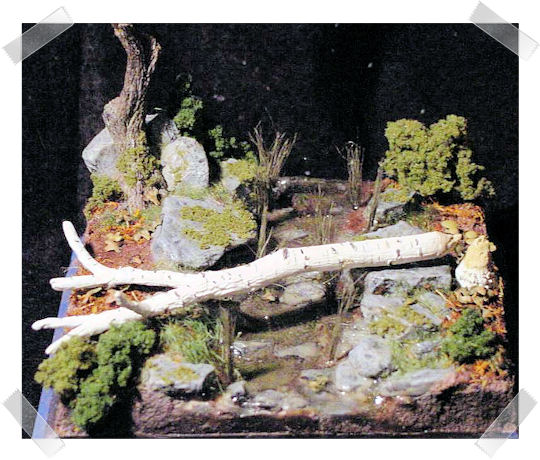
This article will focus on
the base (Picture 1) for Michael Roberts’
“Vignette-in-a-box”, The Pursuit sculpted by Alan Ball
and Mr. Ball’s own Woodland Indian released about the
same time by his own company. From the beginning, I
wanted these three figures in the same setting. I can
fully imagine the third figure having been left out for
reasons of economy and base size.
The first thing I did was to play around with the kit
base and a display base to determine where it would sit.
When I figured out where it would go, I cut some strips
from a Styrofoam block to build up the edges. (Picture
2)
Next came several trials of where the figures would be.
I had already decided I didn’t want them running down
the stream bed as in the box art since the second figure
is lost behind the guy jumping the fallen log. ( Picture
3) is an early trial which I rejected because the guy
jumping over the log didn’t make sense to me in this
position. More trials were done as work on the base
continued. In the end, I decided that the jumping guy
would not be hurdling the log, supported on his arm, but
jumping the stream and log and will be attached to the
edge of the log at his foot and his flattened hand was
replaced with a clenched fist holding a war club.
Before gluing anything in
place, I masked off the exposed parts of the base
because the next steps would be messy. (Picture 4) The
kit base was attached with super glue and the Styrofoam
with white glue. This was set aside to dry overnight.
The next day, I glued several additional rocks in place,
added an Armand Bayardi tree and a resin figure base at
the end of the stream bed. Then, I made a slurry of
Celluclay, ballast, white glue, woody turf material and
brown acrylic craft paint and blended all these elements
together, smoothing the edges with a moistened finger. (
Picture 4) included a test of the tree stump which would
represent the base of the fallen tree.
When the base was dry, I airbrushed the streambed with
burnt umber and the rocks and tree with some shade of
German gray from Model Master. I painted any reaming dry
ground with the acrylic craft paint that was used in the
Celluclay mixture. (Picture 6)
The fallen tree spans the
original base completely and looks fine as such with the
flattened stump and branches. That would not work for
the new base. I gave some thought to explain why a tree
would fall across the stream like this. Beavers have cut
down trees near my house and they leave a distinctive
stump. I decided that would be the cause of the fallen
tree. I sawed off the top of an appropriate Bayardi
stump and built it and the base of the log with Milliput
an typical cone left by beavers. (Picture 7) At the
other end of the tree, the flat ends needed attention as
well. I added armatures of brass rod and covered these
with more Milliput. (Picture 8).
Now the rocks and tree were given a wash of Payne’s Gray
oil and dry brushed with a couple shades of light gray
or beige. The streambed received some random dry
brushing of a light green. Reeds of Woodland Scenics
long grass. (Picture 9) and the tree was dry brushed
with a dark brown to break up the grays in the scene
(Picture 10).
Static grass was added between the rocks and at the base
of the tree. (Pictures 11) while ground cover I picked
up from John at Military Miniatures Warehouse, though I
don’t recall the brand. (Picture 12). Shrubs were added
to fill out the base (Picture 13) though some
adjustments would be made before finishing. ( Picture
14) shows the tips of the stump and fallen log with a
piece of broken tooth pick inserted to depict the area
of the tree that would have broken off as the beaver
chewed away.
Picture 15) shows that water has been added to the
stream bed using Envirotex Polymer coating, a product
just about identical to Liquitex, but more economical.
This is a two part resin sold for use in decoupage. I
dammed off both ends with a bit of Woodland Scenics
Water Effects, a super thick white glue like product.
Even then, a small gap allowed some drainage which is
another reason for taping the exposed base. Next, the
dry boulders were airbrushed with Dull-Cote. (Picture
16) I should have done this sooner to reduce the risk of
flat overspray on the shiny water surface.
The water’s surface was given a few waves and some
turbulence at the edges using Woodland Scenics Water
Effects applied with a fine paint brush. (Picture 17)
Moss was added to a few rocks and the tree using a
slurry of Woodland Scenic's Fine Turf. (Picture 18). To
get the surface smooth, I tamped it down with the sharp
edge of a #11 blade. The final groundwork addition was a
few “HO Scale” plastic mushrooms from Busch
Modellspielwaren. These were cleaned up with a file and
painted. A tiny hole was drilled in the stem and they
were attached using some fine wire.
(Picture 19) The branch
extensions on the fallen tree were thinned form the
original putty blobs and the bark was painted Vallejo
Ivory with black striping and knots to represent a white
birch. (Picture 20) and placed in its final position.
(Pictures 21 and 22)
As a couple final touches, I shaved a toothpick down to
small bits and used white glue to paste them around the
tree stump increasing the impression of a beaver’s work.
(Picture 23) And finally, I sculpted a turtle from
Milliput and painted it green and yellow and placed him
in a rock sunning himself and bearing witness to the
passing warriors. (Picture 24)
From the first night of real work to completion was
about 12 very enjoyable days, particularly with the
documentation. My next step will be the three figures
who will wind up in roughly the same position as in (
Picture 3).
|